
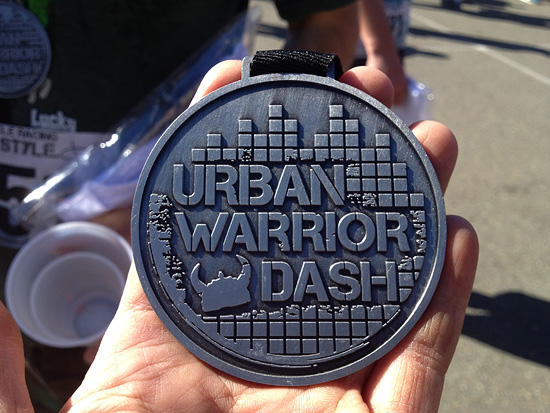
Red Frog Events hosted their first Iron Warrior Dash March 16th in Smithville, Texas. This race was made up of 15 miles of rolling hills, mud, sand, water and tight trails. They also had some unique obstacles that had not been seen before in obstacle racing. Steve Messana was one of the lucky ones to experience this race and take on the 24+ obstacles. He has generously offered to share his experience with us. You can read his Iron Warrior Dash blog below. Be sure to check out Steve’s blog to follow his training and other races he’s covered. http://playitharder.blogspot.com

Sunday, March 24, 2013
Iron Warrior Dash: The Recap
By Steve Messana
So about the Iron Warrior Dash…it’s Saturday morning, Chris picks me up at 6:15 and we arrived at Rocky Hill Ranch in Smithville Texas around 7:00 am. We are fortunate that we are probably one of the first 100 cars to arrive and apparently the organizers aren’t ready for us- no one collecting parking money. By the time we walk from the car toward the event, which felt like every bit of a mile, they are collecting money. Score one for us (that’s 10 bucks for an extra beer after the event). Check-in is well organized and we breeze through it. One feature that you don’t always see at events like these is a bag check. They use a tear-off from our bib number to attach to our bags and we check them during the event, which is great and means that we have towels, snacks, phones, wallets etc. on-site instead of a mile away at the car. So we check our bags and proceed through our pre-race rituals, which varies from person to person. For me this means some fake stretching, aimlessly walking about and at least one if not two trips to the porta-potties (which were plentiful) to try to eliminate the need to stop on the course. Otherwise I might have to tragically give up a pair of socks to the woods- this has never happened to me, but to a close friend of mine, twice.
Pre-race ritual complete, we head to the start line. It’s about 7:55 and although we were both scheduled to start in the 8:30 wave, Chris decides to start at 8:00 since he runs a slower pace. I join him at the start, intending to cheer him on and then wait for my 8:30 start, but in a moment of excitement when the gun goes off, I decide to go ahead and start my run as well.
As in all races I seem to start out running faster than I am capable and although I don’t have a timer on me (mistake noted) one of the other runners near me does and for the first 3 miles I was working on a 8:30/mile pace which is close to my normal road pace so I’m pretty happy. The course is hard-packed clay for the most part with some sand in a few places and few rocky stretches. There aren’t too many elevation changes, overall there is ~320 ft. of climb and 160 feet of that is in the first mile and a half. After the first climb there are three more smaller climbs, all less than 50 feet a piece.
Then of course there are the obstacles, 24 of them on the course. Twelve of them are shared by the 5k’ers and 12 of them are unique to the Iron Warriors. I wish I could remember the order of the obstacles, but I’ve tried and I really don’t. Worse yet, at the moment I can only recall 17 of them. I’ll describe them and sum them up at the end of this, but right now I want to talk about some lessons I learned during the race and things that I’ll need to remember next time around, things that may be helpful to you for any event like this. If you’re bored already, skip on down to the obstacle section….
Race Start: Before the start of the race, it’s a good idea to choose a meeting spot for your team or friends to meet up after the finish. While you may plan on running together, things happen and you might find that the group breaks into multiple groups or someone gets a cramp and the group splits up. Having a place pre-designated to meet will alleviate some of the frustration of trying to get back together afterwards.
Shoes: I talked quite a bit about my shoes in my Training Blog and I am happy to report that my feet fared really well during this race. I enjoyed the New Balance Minimus shoes. They gripped well, drained really well and did a reasonably good job of masking the rocks and sticks on the trail. I did experience some hot spots near the end of the race and I was concerned about multiple blisters, but to my surprise I only have one small blister on the end of my right “index”’ toe and I think it is mostly caused by having my right shoe tied a little too loose. I should warn you though, Chris noticed multiple people on the course wearing barefoot style shoes experiencing severe foot/shoe issues. I am guessing they didn’t practice off-road in these shoes first. If you are a ‘barefoot’ style shoe wearer I highly recommend putting them to the test before the race or finding a sturdier pair of shoes that you are comfortable in for races of this type. I will be wearing the New Balance shoes in the Tough Mudder races in June and July. One other foot note (hah-hah), trim your toe nails, otherwise the constant pounding from the top or end of your shoe will push them into the nail bed and you’ll be left with a black toenail that will most likely fall off…some of us wear this as a badge of courage…
Food: I don’t typically take food along with me on my runs. Rarely do I use gels or bars, but in retrospect I wish I had brought some along for this race. My biggest reason for not bringing bars or gels was for lack of a way to carry them. I didn’t have good pockets and didn’t want to carry a pack of any sort. I didn’t need to carry water since there were 7 water stations along the course – more than enough to keep me hydrated in the cool temps. But by the 9-mile mark I was hungry. I sucked it up this time, but for the Tough Mudder races I will be bringing some food along. I haven’t yet figured out how. I saw some people wearing CamelBaks as well as waist packs and while they are comfortable and efficient, I’m not sure that I want to wear one for 12-15 miles. I will have to take a training run with a light-weight CamelBak and see.
I did talk to one fellow after the race and he wore knee-high socks, which not only served to protect his lower legs from the abrasive sand, mud and vegetation; they also allowed him to slip a couple of gel packs in them. I really like this idea and will probably steal it.
Clothing: There’s a lot of water and mud as well as plenty of sharp things to snag your clothes, so, while it goes without saying, I’ll say it anyway, don’t wear anything you really care about. I wore a wicking Asics running shirt, one that was bright yellow/orange so that I could be easily spotted in photos. I’ve been wearing this shirt in races for years and I can’t believe that it is still in good shape, but it is. It also seems to shed mud really well after a quick wash. For shorts I wore a pair of polyester Adidas shorts that have a spandex inner-short. I chose these because the close-fitting spandex keeps everything in place and also tends to keep small rocks and gravel out during water and mud excursions. I was pretty disappointed in how long they took to dry. Being polyester I expected them to shed water better, so for future races I will be looking for a much lighter weight pair of shorts and will just add a spandex under-layer if it isn’t already incorporated. I already mentioned the importance of quick draining shoes, but wanted to point out that socks are just as important. Even though I wear barefoot style shoes I still couple them with socks. I have been a huge fan of Smartwool socks for years now. So much that 90% of the socks I own are Smartwool, including my dress socks. Look for a non-cotton sock that has good wicking properties to keep the water and sweat away from your feet. Even after 2+ hours of wet shoes and socks, my feet were only slightly wrinkled.

Eyewear/Headwear: I usually forgo headwear while running but I think I am going to change that. I am bald and even though we were in the woods most of the morning, my head still sunburned. I think a hat or a Buff or other head scarf would be helpful. You do run the risk of losing them on a fall in the water or a swim, but you can always tuck it into your waistband, pocket or shirt during the obstacles to prevent that. The Same goes for sunglasses. I watched two people lose their specs into the depths of the water obstacles. If you are going to wear them, get a tight-fitting, floating tether like Chums or something similar. Again, I recommend training with these to make sure they are comfortable enough to wear for the duration of the race; else you run the risk of having to ditch them along the way.
Race Finish: Take a second or two to enjoy the moment, then find your friends or family and celebrate. No matter the race or run, finishing is an accomplishment especially in longer events like the IWD or the Tough Mudder. If you checked a bag at a gear check, get it – there are probably some dry clothes, a towel, some food or drink items that you thought were important before the race that you can now enjoy. I suck at packing my race bag the day before a race and I’m even worse packing it the morning of. I suggest doing this days or even a week before the race. Think about what you crave after a training run. Think about the items you scurry around looking for before a training run and make a list or pack them up as you think of them. I always forget something. I would think by now I would take my own advice. I will next time…sure…

The race was awesome, actually better than awesome! Probably one of the best races I have participated in. Red Frog Events did a fantastic job producing the race and Rocky Hill Ranch was a great venue. The food and beer lines were short, there were plenty of facilities and the smoked turkey legs were steller! Oh yea, I finished the race in 2:46:51 which works out to an 11:07/mile pace. I’m pretty stoked about this. My ultimate goal was three and a half hours and my stretch goal was three, so this finish was almost a minute faster per mile than my stretch. I can’t wait to do this again in June at the Tough Mudder in Colorado. I have my sights set on at least three Tough Mudders (Colorado, Tahoe & Dallas) this year, and I’m sure I will fill in the gaps with some other adventures. Just this morning I ran The Maze, the first of three Rogue Trail Series runs, a 10k race series that is all off-road at three different venues around Austin. Hopefully I’ll get a race summary up here in the next day or two.
The Obstacles: So what about the obstacles and training for them? There are three things that I think are really important…
Hills: Hill training is a must. Hills force your body to use different muscles than the flats and even relatively flat locales like Austin have hidden valleys that diabolical race organizers will ultimately funnel you through during the race. Even if it’s just once a week, work them into the training. It will make a difference.
Upper Body: At least 30% of the obstacles in these races rely on some upper body strength. Your upper body will be called upon to use ropes while climbing angled walls, climbing up and over vertical walls or for obstacles that are similar to the monkey bars from the playground of your youth. Practice the monkey bars. Find a park and practice them. Go bar to bar one direction, turn around without letting go and come back, do it again, skipping every other bar. This will prove useful. Your upper body may make the difference between completing all of the obstacles and not.
Swimming: I think you need to know how to swim. Several of the obstacles are in water that is deeper than you can stand up in. Okay, so you can swim…but can you swim in ice cold water? I was surprised at how much the cold water affected my muscles. Not only was it difficult for swimming, but it was truly amazing how hard it was to run after coming out of the water. This may be hard to practice or experience outside of the race, maybe there is a pool or creek that you can experiment with. If you have the opportunity to do so before your first race I would encourage you to try.
Here are some obstacles I experienced with a short synopsis – I have named them myself since I don’t know all the official names. They are used across many different events so the descriptions may be more helpful anyway.
Barbed Wire Sand Pit
Real barbed wire stretched 18-24 inches above a sand covered pit. Requires belly crawling while using your elbows to pull your body forward.
Difficulty: Easy
Monkey Bars
Similar to the playground style with one wrinkle, the bars are attached to a central spine instead of on the sides and alternating bars are attached one below the spine then one above the spine, changing the height by about 4-5 inches either up or down from bar to bar.
Difficulty: Moderate-Hard
Plywood Valleys
Eight Plywood walls set up like hills and valleys; you climb up the first then down the second, up the third, etc. There are slats or blocks for footing and ropes in the middle valley for balance.
Difficulty: Easy-Moderate
Cliffhanger
Hill covered in plastic with water streaming down it, real barbed wire overhead with ropes to use to claw your way to the top on your belly most of the way.
Difficulty: Moderate
Vertical Walls
Six to seven foot tall vertical walls made out of 2×6 lumber. You have to grab the top and hoist yourself over. I found that I could get my toe just enough of a purchase on the seams of the boards to help raise myself enough to throw my other leg over the walls. This obstacle takes some upper-body strength.
Difficulty: Moderate
Balance Beam
Just like you see on the Olympics, except 10 feet above a pool of water. Requires balance. I started out slow and the beam got wobbly, I was sure I was going to fall so I just ran forward and cleared it without incident. Buy a 4×4 at Home Depot and practice walking across it – leave it at ground level unless you have a safety net…
Difficulty: Moderate
Floating Dock Blocks
This is essentially a floating structure made of large plastic blocks that you have to swim about 20 yards to get to and then climb up the 3-foot face. There are ropes to grab and separations between the blocks that you use to assist in pulling yourself up on. Once on top, you climb down a stair-step of blocks back into the water. This time there is a cargo net submerged just below you. You can use the net to pull you along while you float above it. At the other side you climb back over a couple of floating blocks, then you are back in the water to swim another 20 yards or so to shore.
Tires with Overhead Suspended Cargo Net
 A few hundred tires laying flat on the ground, edge to edge, touching one another with a cargo net suspended about 3 feet above them. Most people were inclined to step inside the center of the tires while holding the net above them with their hands. This method works, but I preferred to walk on the sidewalls of the tires while using my head to keep the net out of the way. The risk here is a twisted ankle and net burns on the forehead.
Difficulty:Easy
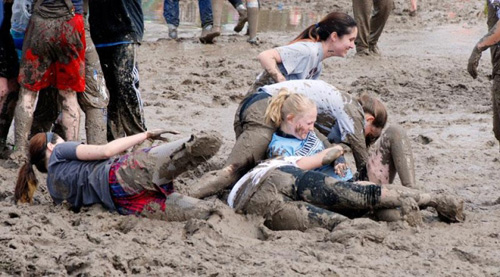
Trenches
A three-foot wide by four-foot deep muddy trench with barbed wire above. Basically a mud pit offering the only option of crouch-walking or crawling through the mud to the other end.
Difficulty: Easy

A-Frame
A-Frame with Rain Shower
Climb up the back side of a 12-foot tall A-frame which has horizontal 2×4’s spaced a couple of feet apart. All the while you are being sprayed with pond water. Once you summit the A-frame you climb down the plywood backside with the aid of ropes and horizontal boards that run the width of the obstacle.
Difficulty: Easy
Pegboard Hell
Imaging 3 walls 10 feet off the ground in a u-shape. The walls have holes in them a bit bigger than silver dollars – these holes do not go all the way through. You have two pegs that fit in each hole – sort of, and you are supposed to traverse from one edge of the horse shoe to the other using said pegs, to move from hole to hole while supporting your body weight. This one was near impossible. The pegs only went part way in the hole and the holes diameter was larger than the peg so the peg slanted. I tried twice. Landed on my back…twice. I did see two people complete the obstacle, so it wasn’t impossible…but it was really, really tough. Toughest out there and I’m pissed I couldn’t complete it. I’m a sore loser…
Difficulty: Almost Impossible
Sewer Pipes with Muddy Water
Plastic black drainage pipes, 3-foot diameter by 15’ long, lying flat on the ground in shallow trenches. Each filled about 12 inches deep with muddy water. You crawl through them. They are relatively smooth on the inside, but still hard on the knees.
Difficulty: Easy

Cargo Net Tube
Cargo Net Tube
Essentially a cargo net shaped into a 15-foot long, three-foot diameter tube suspended a few feet off the ground that you crawl through from one end to the other. I liked to call this the birthing canal.
Difficulty: Easy
Chain Ladder
Similar to an A-frame ladder, but replace the rungs with metal chains. Hold onto the wooden frame supports while you climb up and over the obstacle.
Trenches with Dirt Mounds
Picture a 5-foot tall mound of dirt that once you climb up, over and down, ends in a 4-foot deep trench with vertical walls followed by another hill of dirt. Repeat four times. The hills, once you are on them, are easy. The trenches, once you are in them, not-so-much. Most participants worked as teams to get through this one as it was really hard to find anything to grab to pull yourself out. This requires upper body strength to ‘mantel’ yourself out (mantelling is a climbing move where you push down on a ledge or other feature to hoist yourself up).
Difficulty: Hard
Fire Jump
Intimidating but really pretty easy. You only need to clear a pile of logs about 16 inches high. The worst part about this was the smoke that was blowing right into my face as I approached.
Difficulty: Easy
Barbed Wire Mud Pit

Barbed Wire Mud Pit
Real barbed wire stretched 24 inches above a mud filled pit. This requires a lengthy belly crawl. It seemed like the easiest way to traverse this was to actually use a swimming motion with my arms. Kicking was dangerous as there are people all around. Walking at the end was possible once the barbed wire was past, but swimming was more efficient.
Difficulty: Easy
Thanks again to Steve for providing such a great recap of the race. This definitely looks like one to check out when it comes to your city. We have heard from Red Frog that they are looking to expand to other cities in 2013, so be on the lookout for Iron Warrior Dash coming to your town!


Speak Your Mind